Category Archives: Technology

AI Noise Suppression is an Amateur Radio breakthrough

The Noise Problem

Background noise which is usually present in DX (distant) communication over amateur radio is challenging and creates listening fatigue. The noise is like listening to an AM radio station in a distant city fading in and out of the static. Amateur radio noise reduction has gone through multiple generations of technology to reduce noise, but eliminating noise has been elusive. Each new generation of noise reduction technology creates a significant demand from operators to upgrade their radios. Individuals who participate in amateur radio contests spend a lot on the components of their radio station to make as many DX contacts as possible during a contest. Contesters would have an easier time to score points with noise elimination. Noise also contributes to some operators’ focus on local communication since it typically utilizes noise-free and high-fidelity FM modulation which is easy to hear.

The AI Claim

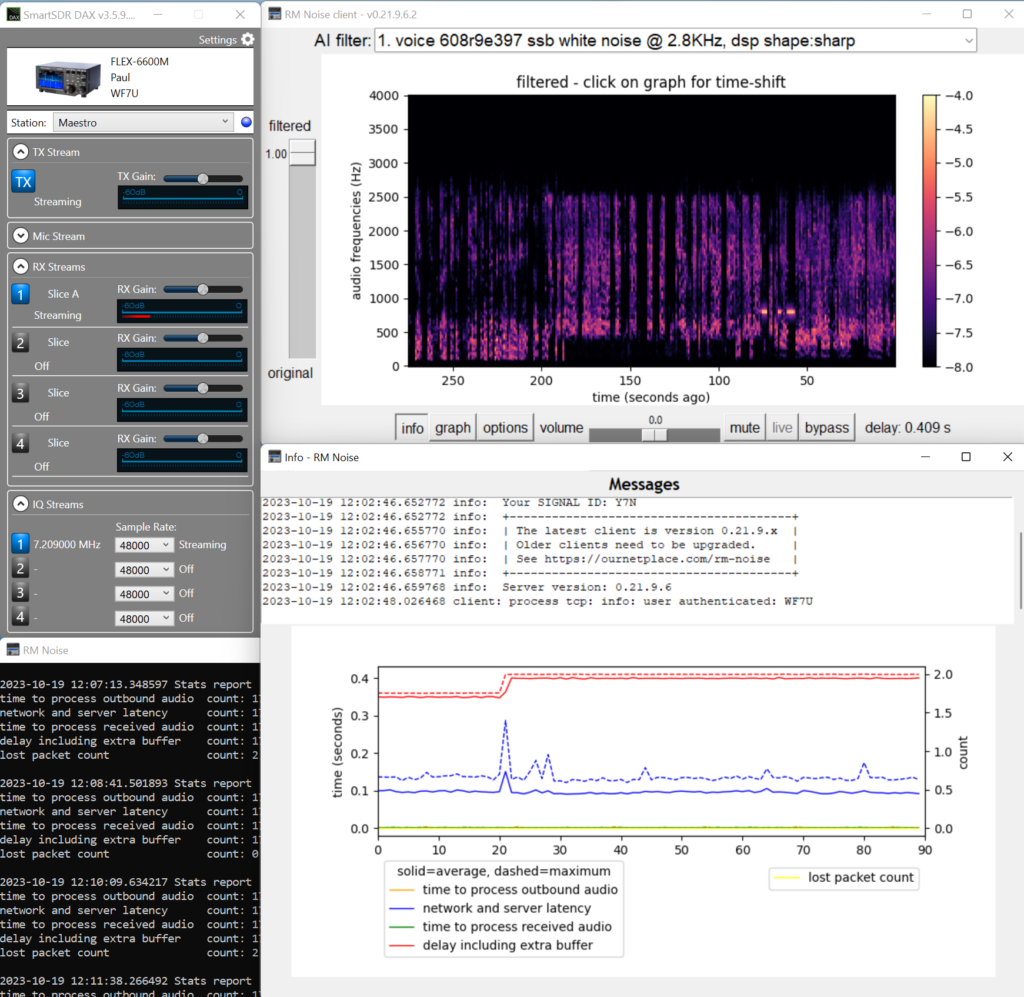
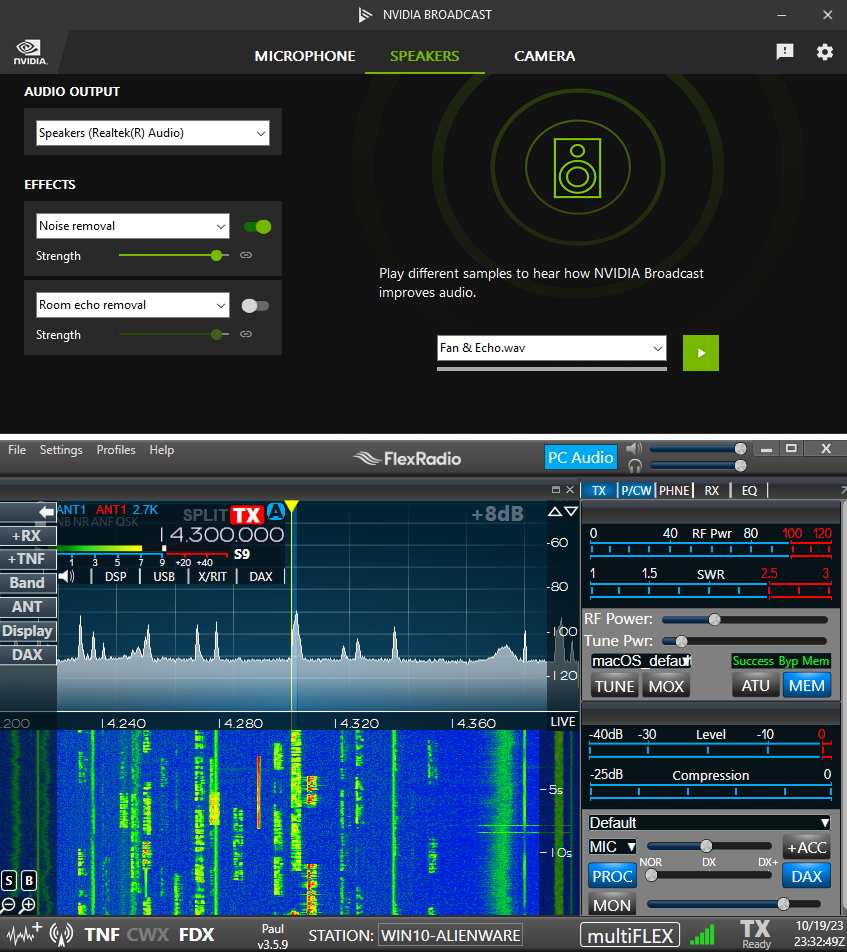
I was skeptical when I read “Pretty awesome #AI noise canceling” from TheOperator on X (Twitter) earlier this week. I decided to try it out. It only took 10 minutes to configure the “RM Noise” Windows program and virtually connect it to my HF FlexRadio “server” with SmartSDR DAX. The process was easy, including registering my call sign with RM Noise.

RM Noise working with the FlexRadio SmartSDR to eliminate noise

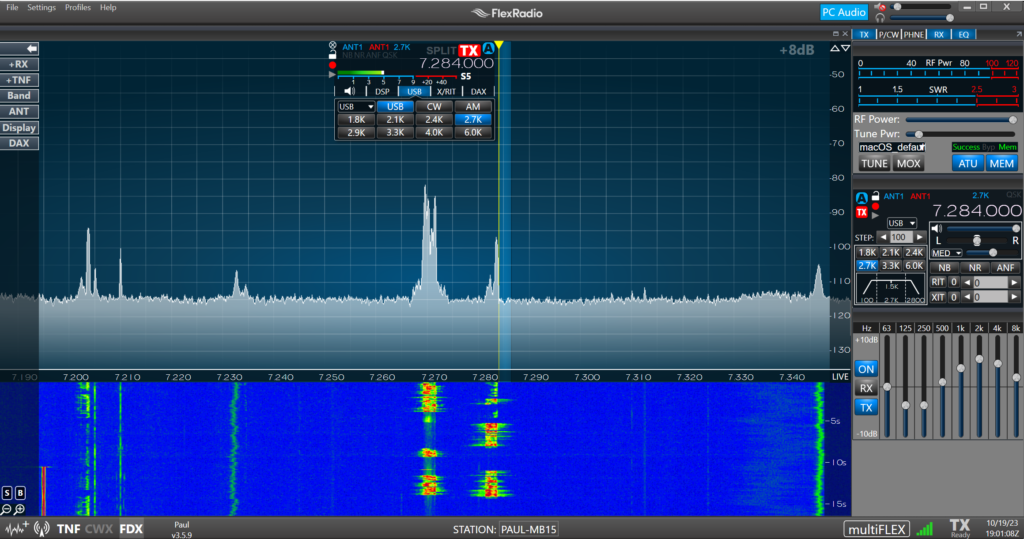
FlexRadio is a state-of-the-art Software Defined Radio (SDR) – the Cadillac of HF amateur radios. It cost more than the first used car I bought. It’s not much more challenging to connect RM Noise to other HF Amateur Radios since the popularity of WSJT digital modulation uses the same radio interface.

FlexRadio receiving the Noon-Time Net

How Did it Work?

I was shocked listening to a net (amateur radio meeting) using RM Noise. Noise was eliminated without buying a new radio. I could hear a conversation with a weak signal barely above the noise floor that was absent on the pan adapter. I now believe a comment I read stating that they can no longer tolerate their radio without it.

Today was the first time I listened to my HF radio all day. Typically, I would get tired from the noise after an hour. I didn’t experience any noise fatigue. The sound quality is similar to listening to a local AM radio station. This is surprising since the dominant single-sideband (SSB) communication on HF rarely sounds as good as AM modulation.

I already found that RM Noise is indispensable. There are opportunities to improve it further: Weak signals are quiet. Your radio’s automatic level control (ALC) doesn’t “work” after RM Noise filtering. My FlexRadio ALC keeps a consistent audio level, which may include a lot of noise. With the loud noise component removed, only a quieter and understandable audio signal is left. Filtering adjacent radio signals must be performed on the radio itself since the software doesn’t include this functionality.

Now I understand Jensen Huang’s words from earlier this year, “AI is at an inflection point, setting up for broad adoption reaching into every industry.” , i.e., including Amateur Radio.

How does it work & the importance of AI model customization

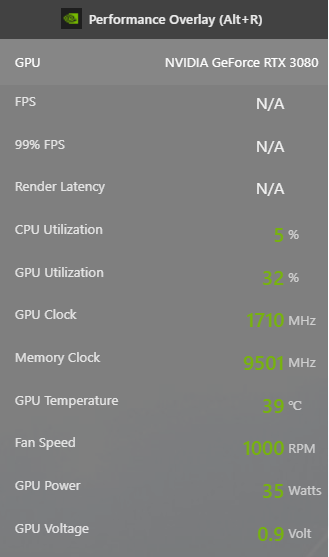
I’ve previously experimented with NVIDIA Broadcast, which runs on my local PC with an NVIDIA RTX 3080. The 3080 includes AI functionality. Broadcast provided similar results to RM Noise for strong signals. Broadcast offered limited value since the weaker signals were dropped as noise. The difference between Broadcast and RM Noise is AI model customization. RM Noise was trained with a customized noise reduction model with the traffic heard on amateur radio phone (voice) and CW (morse code) traffic. If NVIDIA created an “Amateur Radio Noise removal” effect, Broadcast could work the same as RM Noise.

NVIDIA Broadcast connected to the FlexRadio to remove noise
NVIDIA RTX 3080 performance while removing noise

AI Runtime

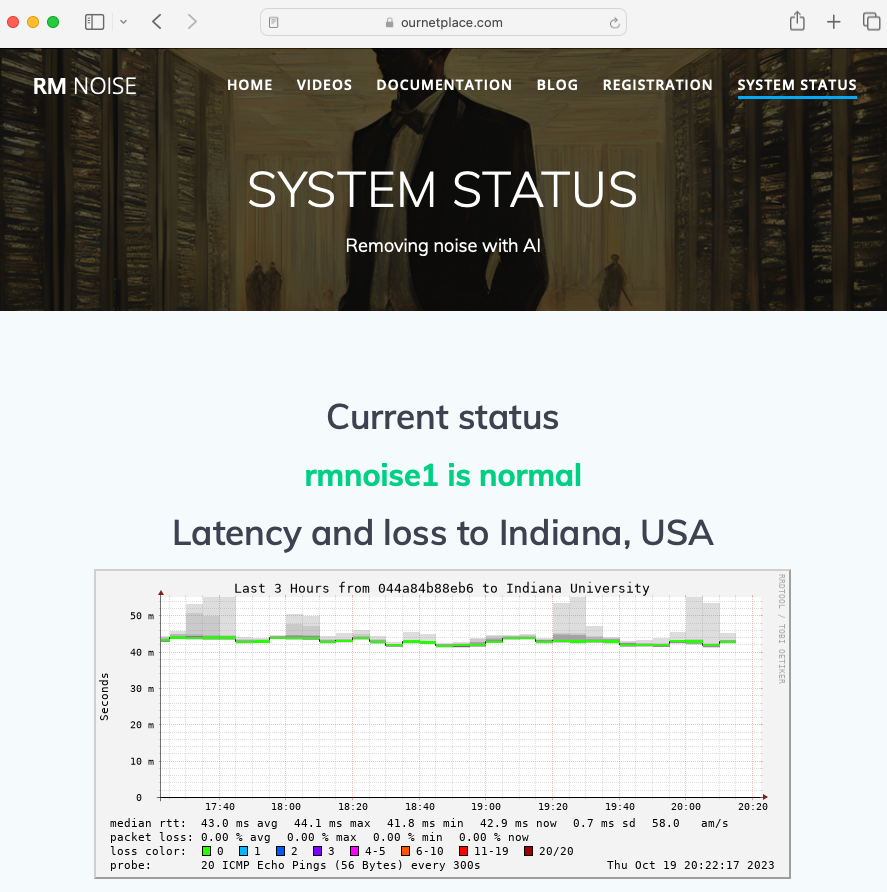
RM Noise is a cloud-based application that uses a Windows client program to send and receive audio. The only hardware requirements are: “A Windows computer with internet access and the audio line in connected to a radio” according to their website.

The noisy audio from the radio is sent to a RM Noise dedicated inference server over the Internet for noise reduction. Besides returning the AI-cleaned audio to the end user in real-time, the audio could be retained to improve the AI model. As more people use the model, the data scientist has more audio to improve the customized noise reduction AI model.

RM Noise Cloud Service Status

AI Model Demystification – 40,000 foot view

AI deployment in Amateur Radio is bleeding edge and not understood by most operators. RM Noise uses an AI Model to make decisions with pattern recognition on what sounds are noise and need elimination. This core of RM Noise is a predictive model based on “listening” to a lot of amateur radio traffic.

Picture of Mount Saint Helens from my seat on Alaska Airlines which was close to 40,000 feet

My description below is based on AI fundamentals I learned while working with Data Scientists at Microsoft developing Windows 10. The 40,000-foot view of the RM Noise AI platform includes data collection, predictive model development, runtime deployment in the cloud, and continuous improvement.

Data Collection: A LOT of typical amateur radio traffic, both phone and CW, is collected in digital form. The data requires curation. This curation includes preprocessing, structuring, and cleaning. They manually inspect every recording prior to including it in the training dataset. Various data are needed, examples include different propagation conditions, spoken languages, accents, radios, QRM, QRN, CW paddle, CW straight key, CW speeds, and bandwidths.

Predictive Model Development: Existing AI models and architectures are explored with the data collected. Experiments with statistical techniques are used to measure how accurately the model’s predictions match the desired noise reduction. If the experiment bombs, the data scientist will try a new model or architecture and validate that the data was curated correctly. Potentially, more diverse data is required. Regardless, many experiments are conducted to improve the model. This is how the model is trained with actual amateur radio audio traffic. I didn’t understand when I took statistics, and quantified business analysis classes would be prerequisites for understanding AI.

My textbook from Quantified Business Analysis Class at Marquette Business School

Cloud Runtime Deployment: Once the RM Noise data scientist is satisfied with the results, the AI model runtime, also known as an inference server, is deployed on the Internet. Amateur Radio operators with the RM Noise Python-based Windows PC program will send all of their radio audio to the inference server on the Internet, returning cleaned audio.

Continuous Improvement: RM Noise accepts audio recordings for tests and problems. This data goes back to all of the previous steps already described to include in the model. The noise reduction service continually improves over time.

Whats Next?

Amateur Radio AI noise elimination is at the beginning of the change adoption curve. Innovators are starting to use it and enjoy the value it brings. There is also a need for local AI noise elimination for Amateur Radio field day and other places where radio operators don’t have Internet access. I expect these AI models to become embedded in local processing accessories and embedded inside the radio. I’m glad I took the time to investigate the RM noise, the most significant innovation in Amateur Radio this year I’ve experienced.

Why did I buy & build a VCF home lab

At last week’s VMware Explore customer conference, I was asked why I deployed VMware Cloud Foundation (VCF) at home. That question reminded me of the following:
“When people ask me what ham radio is all about, I usually respond with ‘The universal purpose of ham radio is to have fun messing around with radios.’” Witte, B. (2019). VHF, Summits, and More. Signal Blue LLC.

I’d say the same motivation from my radio hobby extends to my computer hobby, which I became interested in as a teenager.  At Washington High School of Information Technology, the first large minicomputers I had exposure to was the Digital Equipment Corp PDP 11/70 & VAX 11/780.

My PDP 11/70 fully functioning replica kit. Looking to add an actual VT-100 terminal!

VCF is a modern “minicomputer” that manages a distributed fleet of servers in a cloud model. It’s not unlike having a micro version of your own AWS data center or VMware’s version of AWS Outposts. I became excited when VCF was launched in 2016 because I understood it was the future of VMware and that it is a relatively easy cloud to deploy and manage. When I read about an “affordable” VCF Lab Constructor (VLC) tool, part of VMware Holodeck, in 2020, I decided to build my own.

Large ex-public cloud server with 768GB RAM & 32 cores in my garage running nested VCF

VCF learning lab

I use VCF to get hands-on experience using the latest VMware software and to satisfy my curiosity. The VMware product line is broad, and my role requires understanding the entire portfolio. Since virtualization is a crucial building block, many concepts are abstract when first learning about them. These abstract concepts became something I recognized after getting my hands dirty by deploying and using the software after training.

VCF with VLC reduces my personal investment in physical computing infrastructure and hardware required to deploy and operate the software through virtualization. Less hardware saves energy and reduces my electric bill. Due to the automation and ability to define your data center configuration (a/k/a Infrastructure-as-Code IaC) through configuration files, all deployment information is captured in files. These files include the VCF Deployment Parameter workbook and multiple JSON files. The configuration includes nested hosts, compute virtualization, virtualized networking with BGP routing for connectivity to my home LAN, and virtualized storage. Anyone who has designed and configured virtualized networking will appreciate the time savings of re-using a virtual network configuration and an edge off-ramp to your physical network and the Internet.

VCF deployment parameters workbook
additional IaC example to configure nested hosts in workload domain

It’s easy to save my previous work or have a fallback plan before majorly changing my private cloud. Examples include upgrading from VCF 4.5 to 5.0 or switching a workload domain from Kubernetes with VMware Tanzu to an entirely different workload, such as advanced networking virtualization with NSX IDS/IPS. This is accomplished by shutting down the VCF environment and copying the files comprising the nested host. These nested hosts are VMs. After the nested host files are safely stored, I can start fresh using the previous IaC configuration as a starting point. Virtualization, automation, and IaC free a lot of time and resources to make my learning more efficient.

Holodeck allows far greater capacity in a lab environment with the capability of quickly saving & switching workload domains. This image shows 5 different examples of workload domains for hands-on learning

VCF provides an integrated private cloud software suite with custom workload domain and lifecycle domain management. I wonder how anyone could fully understand how VCF works in a production environment without hands-on experience. Without VMware Holodeck, the investment to deploy VCF for learning would be an order of magnitude more expensive and out of reach for me.

The file system on my large server – each nested host is represented by files for each VM

What about Production workloads?

I also have a traditional VMware private cloud home lab. With this lab, I understand how the VMware stack runs directly on bare metal with a physical switched network, vSAN, and NAS. Second, this home lab has taken on amateur radio workloads in production 7×24. These production workloads provide me with the experience of managing and operating an environment I can’t just turn off and wipe out. I’ve learned the discipline of managing vSAN, backups, and a graceful UPS shutdown with production constraints.

Production workloads in my traditional VMware home lab
Traditional VMware Home Lab in my office closet

Modern Day Icarus Story – Part 2 NSX Manager Restore

My previous blog described how I was lucky that the Linux filesystem check (fsck) command repaired my critical vCenter server VM which manages my home lab. My VMware NSX-T Manager version 3.1.2 VM also suffered a corrupt file system due to the physical switch failure. This failure halted the appliance. NSX-T is a critical networking infrastructure component in my home lab supporting multiple virtual network segments, routers, and firewalls.

corrupt NSX-T Manager VM

If this was a production deployment of NSX-T recovery isn’t necessary. VMware has made it crystal clear that NSX Manager requires 3 nodes and it is recommended that they are placed on different hosts. These 3 nodes are separate instances of the NSX Manager VM each with a distributed & connected Corfu database. Each node has the same view of the NSX-T configuration and they are always synchronized. NSX-T Manager continues to operate even if one of node fails. However, I only had a single NSX-T Manager node deployed since this is a home lab learning environment. The high availability easy button provided by NSX-T didn’t exist since I didn’t follow VMware’s guidance of deploying 3 nodes. Recovery was necessary for my NSX-T deployment.

NSX-T Manager fsck

I followed Tom Fojta’s “Recovering NSX-T Manager from File System Corruption” blog to recover the NSX-T Manager file system. This was more complicated than repairing the vCenter file system covered in Part 1 of this blog series since the Linux kernel was unable to start due to the root file system corruption.

Recovering the file system following the steps in Tom Fojta’s blog

This time recovering the file system didn’t work. Linux successfully booted and NSX-T Manager started. When I checked the NSX-T Manager cluster status the state would remain in the dreaded UNAVAILABLE state. I was hoping to see the output shown below which is from a healthy NSX-T Manager. I reviewed the NSX-T logs but the problem eluded me.

example of a healthy NSX-T cluster

I decided to stop troubleshooting and attempt restoring the NSX-T configuration from my backup.

Restoring the NSX-T Backup

Restoring the NSX-T backup is straightforward. My first step was to start all edge appliance VM’s from the previous deployment. I didn’t find this step documented but after my second attempt I learned that this is the easiest way to restore the entire NSX-T environment. If the edge appliance VM’s are gone or corrupted they can be redeployed from NSX-T manager after restoring the backup.

I keep a OneNote filled with my entire NSX-T configuration including the NSX-T Backup Configuration. The correct parameters and passphrase must be provided to restore a backup. I also keep a copy of the NSX-T Unified Appliance OVA deployed in my home lab. By keeping a copy of the deployed OVA the backup is tied to the same version of the appliance.

NSX-T backup configuration from my OneNote notebook

The second step is to deploy the NSX-T Unified Appliance OVA and start the VM. After the NSX-T Manager UI is active, it is necessary to re-enter all of the backup configuration parameters used in the backup. Once the backup configuration is entered, the backups available to restore are shown below.

NSX-T Configuration backups available

Once the NSX-T backup is selected for restoration the following steps are displayed:

Explanation of the NSX-T configuration restore process from the NSX-T Manager UI

The following restore status is shown with a progress bar.

Restore process status

After the NSX-T Manager UI reboots the following completion message is displayed. Total restore time was 42 minutes where I only had to watch the progress unfold.

Restore process completed

Success

This was the first time I attempted an NSX-T restore from my backup. I’m glad I went through the steps to configure a sftp server to hold my backup on a unique storage device. This was a big time saver. I could have also corrupted my NSX-T configuration backup with the physical switch failure if I had placed the backup on the same NAS NFS server. With my VMware home lab restored I can get back to work on my original goal of deploying HCX.

NSX-T up and running

Modern Day Icarus Story – Part 1 fsck

Configuring VMware HCX in my home lab to migrate VM’s between two VMware vCenter clusters was my goal this week. HCX simplifies application mobility and migration between clouds. Last week I successfully paired both sites and I was ready to extend the network.

I discovered that my target site was inaccessible on Monday morning. I was disappointed since this worked last week. The troubleshooting process pointed to my tp-link T1700G-28TQ switch in my home lab as a possible culprit. After ping failures, I unplugged the Ethernet cable connected to my target site router and to my surprise the link light stayed on instead of going out. Quickly I discovered that the management plane of the switch crashed but the data plane was still switching some but not all traffic. I rebooted the switch and the networking problem was solved. I successfully logged into the HCX target site but I started to feel the heat from the sun melt the wax in my wings.

tplink switch at top of rack

I didn’t expect I would run into new problems at the source site that after I solved the target site networking problem. The management UI for both NSX-T and vCenter Server at the source site weren’t accessible. I started to loose altitude from some feathers coming off my wing once I saw the dreaded write failures from their Linux console on both VMs. My home lab uses both VMware vSAN and NFSv3 on a QNAP NAS for storage. These critical VM’s were stored on the QNAP NAS. This NAS has one network path through the failed switch. I wouldn’t of have any issues if I stored these VM’s on vSAN since these servers are connected to two switches for redundancy in case of a single failure. After rebooting both management VM’s I saw that the file systems were corrupted and the VM’s were halted.

VMware vCenter file system errors on console

I knew I wouldn’t crash and drown in the ocean below like Icarus when I was able to successfully boot the VM and access the vCenter Server UI after cleaning the filesystem. I followed VMware knowledge base article 2149838 which described the recommended approach with e2fsck.

Prior to taking an in-depth enterprise Linux class I would have been anxious editing the grub loader to change the boot target and clean the file system. However these steps were now second nature to me since I had to do these steps by memory to pass the associated hands-on Linux certification from the class.

I haven’t managed my home lab like an enterprise environment by taking shortcuts to save time and money. I was lucky that fsck worked since I didn’t have a vCenter or a distributed virtual switch (dvs) backup. Due to this hard lesson I configured a vCenter backup schedule and exported the dvs configuration. My next blog will go over the steps I took to recover the NSX management console and VM.

vCenter Backup UI

VMware Cloud Foundation 4.01 VMUG presentation

I’ve been busy this summer deploying VMware Cloud Foundation 4.01 (VCF) at home.

Deployment on SuperMicro 6018U-TR4T SuperServer in my garage

Yesterday I presented my experience on VCF hosted in my home lab on a single nested host. After I read the VMware blog post in January I couldn’t wait to deploy with the VLC software. Click for a recording of my presentation & demo at the Seattle VMware User Group (VMUG).

Following are the links from my presentation:

A future goal is to develop a blog series on the presentation and what I learned.

Motivation to run a resource donation marathon

Deploying the VMware Folding@home fling to join the worlds largest distributed supercomputer is a worthwhile and interesting pursuit. Scientific research will require a monumental number of person-years over a long period of time to develop treatments and a vaccine. Standing up the Folding@home software is only the first step. It will take a marathon to win this race.

Author pictured after completing 26.2 miles of the 2011 Seattle Marathon

My previous blog post described how to contribute home lab resources with a negligible impact on performance and responsiveness. This is only the first obstacle to overcome. When I was training for the marathon I “hit the wall” during a 20 mile training run. I lost any motivation to move another step once I depleted all of my energy stores. I learned from this experience and accepted every GU energy supplement offered during the race to finish the Seattle Marathon. Contributing computer resources to researchers isn’t sustainable if your electricity bill doubles. The fear of a large energy bill is also an example of “hitting the wall”. Beyond the personal financial impact, natural resources are inefficiently used if someone else can provide IT resources more efficiently.

Measurement

In 2003 I attended an event in Pasadena, CA where the late Peter Drucker spoke. Mr. Drucker has been described as “the founder of modern management”.

Book Peter Drucker signed during the event

I learned during his speech how important measurement is to achieve organizational goals. I took his lesson and started measuring to understand whether donating computing resources was a sustainable activity for me. Next I needed to decide what to measure.

Measurement: Electricity usage

All servers, NAS, and networking infrastructure are plugged into a CyberPower CST135XLU UPS I bought at Costco. The UPS measures the electricity used by all of the equipment in the half-rack, not only the servers.

CyberPower CST135XLU UPS in lower right which powers my half rack home lab. The UPS distributes power through a CyberPower RKBS15S2F10R 15A 12-Outlet 1U RM Rackbar Surge Suppressor (in the middle of the rack with a two green LED’s on the left side)

This UPS supports CyberPower’s PowerPanel Business VMware virtual appliance. It provides detailed reporting in addition to a graceful shutdown capability during a power outage to protect my vSAN datastore.

PowerPanel Business logs energy load percentage recorded every 10 minutes. Watts consumed is a calculation of the energy load percentage multiplied by total capacity of the UPS which is 810 watts. For example a reading of 35% energy load represents the use of 283.5 watts.

Transition from baseline to deploying Folding@home

An Excel pivot table is used to analyze the home lab energy usage data imported from the CyberPower UPS PowerPanel CSV file. The pivot table made it easy to graph, average and total electricity usage per day.

Excel Graph created from UPS energy data summarized in pivot table.

The graph shows both the lower baseline energy usage and how the energy usage increased after I began donating computing time to Folding@home and Rosetta@home. The dips shown after deploying Folding@home is due to the servers waiting for work units from protein researchers. After the work units are received the energy usage increases as the servers increase utilization. Finally, 100% CPU utilization results in increased energy usage after I deployed VMware Distributed Resource Scheduler using shares and adding Rosetta@home.

Measurement: Cluster compute capacity

VMware vSphere measures cumulative compute capacity of a cluster which is more tangible than percentage of CPU utilization. In my home lab I have 26.2 GHz of CPU capacity, which is derived as follows:

  • 3 Supermicro SuperServer E300-8D servers each with an Intel Xeon D-1518 CPU
  • Each Intel Xeon D-1518 CPU has 4 cores running @ 2.20 GHz
  • Total cluster compute power 26.2 GHz = 3 servers * 4 cores/each * 2.20 GHz

Baseline energy use – prior to donating compute resources

VMware vSphere 7.0 CPU performance graph over previous year from an individual server.

A 25% CPU utilization baseline prior to donating resources was used from eyeballing the vSphere annual home lab CPU performance graph above. The baseline consumes 6.6 Ghz of compute, which is derived by taking 25% (CPU capacity) of 26.4 GHz total cluster capacity. CyperPower UPS PowerPanel software reported the electricity cost averaged $21.56 per month for 177 kilowatts during the baseline time period. Puget Sound Energy supplies electricity @ $0.122/kwh including all taxes.

Incremental energy use after donating spare capacity

A surplus of 19.8 Ghz of compute capacity is unused in the cluster, which is the 75% of capacity.

VMware vSphere 7.0 CPU performance graph over a year for an individual server. The rocketing CPU % increase in the far right is due to donating computer resources

The sharp increase to 100% CPU utilization on the far right of the graph is from donating computer resources through Folding@home fling and Rosetta@home. The entire home lab infrastructure including servers running 7 days a week, 24 hours a day consumes the majority of the energy even if it has a light load. The additional 19.8 GHz of compute work across all 3 servers barely increased electricity costs by $1.80 per 5 kilowatts.  

The graph & table below illustrates how donating an incremental 19.8 Ghz of compute results in a disproportionately small increase in electricity usage. This seems counter intuitive prior to analyzing the data.

The baseline workload consumed the majority of the electricity usage prior to increasing utilization. This illustrates how underutilized data centers waste a majority of their capacity and energy. Utilizing all of the computing capacity is extremely efficient. 

Graph: Incremental energy use and cost for donating unused compute to Folding@home and Rosetta@home
Table: Incremental energy use and cost for donating unused compute to Folding@home and Rosetta@home

A “Muscle Car” Home Lab

Many purchase retired enterprise class servers on eBay to build a home lab. Used enterprise class servers are inexpensive to purchase compared to buying new. Computer enthusiasts enjoy these big iron servers with many blinking lights and loud whirling fans. That’s a lot like how car enthusiasts treasure a muscle car with a powerful engine. These servers have large power supplies with a maximum rating of 400-900 watts. 

The power outlet for my home lab is a typical shared 20 amp residential circuit. Three enterprise class servers pulling 900 watts would require a 22.5 amp circuit @ 120 volts. This power demand would require new electrical wiring and specialized receptacles installed by an electrician. A much larger UPS would also be required. Enterprise servers generate a lot of heat and noise from the cooling fans.

One of my co-workers has an exhaust fan which draws the heat from his enterprise servers into a vented attic. Snow doesn’t accumulate on his roof above his home lab due to the heat generated.

I don’t expect enterprise class servers to double their electricity usage if the server is already continuously running. I anticipate that the same pattern would exist, where incremental compute resources for Folding@home would have a small energy footprint.

If donating compute time changes the home lab usage pattern it would consume much more energy and easily result in a doubling of an electric bill. Turning on a home lab only for testing, education and practice is a much different use pattern than running a home lab continuously.

A “Green” Home Lab

A goal for my home lab was running it continuously, 24 hours a day, and 7 days a week. Energy efficiency or “Green” became a goal for my home lab after performing an energy cost comparison. A used enterprise server with a low server purchase price could become the most expensive option after assessing the total cost including larger UPS, new high amperage circuits, cooling, and continuous electricity use over many years. 

The SuperMicro SuperServer E300-8D’s in my home lab have laptop sized power supplies with a maximum rating of 84 watts. This power supply is approximately 10% to 20% of the capacity of an enterprise server power supply.

SuperMicro SuperServer E300-8D – FSP Group FSP084-DIBAN2 84 watt power supply

These power supplies are compliance with US Department of Energy efficiency level VI which was went into effect in 2016.

Power Supplies – Efficiency Level VI

This standard requires at least 88% efficiency and the remainder is wasted as heat. Less heat will make it difficult to melt snow on your roof but results in a more sustainable home lab. 

My entire home lab including all of the storage, networking hardware, 2 mini infrastructure servers, and 3 lab servers uses less power than 1 enterprise class server.

Don’t Stop Running

When I ran the Seattle Marathon, I noticed at mile 19 people around me stopped running and began walking up Capitol Hill from the flat ground along Lake Washington. I repeated saying “keep on running” to myself so I could finish the marathon and keep the momentum going. 

Donating excess computer resources in my example is close to free. It inexpensively provides a great deal of value to researchers. Due to the low incremental cost of energy and money, I have the motivation to continue running this long marathon. 

How to have a happy home lab while donating compute resources to coronavirus researchers

My previous blog post described donating home lab compute resources to cornavirus researchers. Will my home lab get bogged down and become painfully unresponsive? This is the first question I had after donating compute resources. Interest in doing good could quickly wane if it becomes difficult to get my work done.

The rapid growth of Folding@home resulted in temporary shortages of work units for computers enlisted in the project. A Folding@home work unit is a unit of protein data which requires analysis by a computer.

example of folding@home virtual appliance fling busy computing work units. It’s more gratify to see work getting done instead of waiting for work units on an idle server.

While waiting, I “discovered” Rosetta@home

The University of Washington (UW) Institute of Protein Design has a similar project called Rosetta@home. Even though I’m a different UW alumni (University of Wisconsin – not Washington) I’ve made Seattle my home over the last 12 years. I joined this project to help my neighboring researchers. It’s not as easy as deploying the VMware virtual appliance fling for Folding@home. First I manually created the vm, deployed Red Hat Enterprise Linux in each vm, updated the OS, and then installed the BOINC package. The BOINC package is available for many other OS’s.

Rosetta@home in action

What if

What if I could prioritize my regular home lab work AND use excess capacity for Rosetta@home while I was waiting for the release of new Folding@home workloads? Could I retain my fast and responsive home lab and donate excess resources?

CPU’s are always executing instructions regardless if they have any work to do. Most of the time they have nothing to do. Instead of filling empty space with the idle process, Folding & Rosetta @home can execute instead of the CPU consuming empty calories.

Scheduling

vSphere’s Distributed Resource Scheduler (DRS) ensures that vms receives the right amount of resources based on the policy defined by the administrator. I reopened my course manual from the VMware Education “vSphere: Install, Configure, Manage plus Optimize and Scale Fast Track [V6.5]” class & exam I completed in 2018 to refresh my memory on the scheduling options available.

Resource Pools & Shares

The above screenshot shows the DRS resource pools defined to achieve my CPU scheduling goals. This example uses vSphere 7 which was released last week however this feature has been available for many years. I utilized shares to maximize my CPU utilization by ensuring that the 24 CPU cores in my home lab are always busy with work instead of executing an idle process which does nothing.

I defined a higher relative priorities for regular workloads and a lower priority for “Community Distributing Computing” workloads. The picture below illustrates how the “Community Distributed Computing Resource Pool” is configured with low shares.

My individual regular workload vms by default have normal shares, which is a higher relative priority than the low shares resource pool shown above. This results in a negligible impact to performance for my regular workloads. I haven’t noticed the extra load which is fully utilizing the last drops of processing capacity my CPU’s. Below is a cluster based CPU usage utilization graph from vRealize Operations 8.0. The 3 CPU’s had plenty of unused capacity while they were waiting for Folding@home work units. This is circled in blue prior to adding Rosetta@home to the cluster. Once I added Rosetta@home with the DRS shares policy all of the CPU cores in the cluster were fully utilized, this is the area circled in red.

vRealize Operations 8.0 Cluster CPU Utilization

Prioritize Multiple Community Distributing Projects

I also utilized shares to prioritize the remaining CPU resources between Folding@home and Rosetta@home. Shown below is a high relative priority shares resource pool for Folding@home and a low relative priority shares resource pool for Rosetta@home. This example starves Rosetta@home for CPU resources when Folding@home is active with work units. If Folding@home is waiting for resources, Rosetta@home will claim all of the unused CPU resources. These relative priorities aren’t impacting my regular workloads.

Enterprise IT & Public Cloud Functionality

Large enterprise IT customers use these same features to fully utilize their data center resources. A common example is to place production and dev/test workloads on the same cluster, and provide production workloads a higher priority. Enterprise customers improve their data center return on investment since they don’t have underutilized computing resources. Public cloud providers use this same model to sell efficient compute services.

Happy Home Lab

The home lab is happy since it is contributing unused CPU processing power to the community without impacting performance of everything else. My next blog post will describe the sustainability of the solution and impact to my Puget Sound Energy electricity bill.

Providing valuable computing resources to coronavirus researchers by giving time

The global pandemic crisis has quickly mobilized a new volunteer community at technology companies and beyond. This community is providing a vast amount of valuable computing resources to leading biomedical academic researchers. One of the reasons why researchers need resources is to learn how the coronavirus works. This knowledge can help the development vaccines and medicine to fight it.

I’ve been fortunate to receive help from countless individuals who contributed to building my talents throughout my life. I can’t sew masks like my wife Michelle is doing to help our front line heroes, but I’m contributing my time and talents to donate computer resources and get the word out.


Michelle Sundquist’s mask production for her niece and co-workers who are nursing assistants in Idaho

Folding@home is the largest volunteer project contributing unused processing power to biomedical researchers understanding human proteins. Technology for this project is similar to the popular seti@home project to search for alien life. Both of these project use unused processing power from anyone who installed their software. Currently the Folding@Home project is the largest supercomputer in the world.

Giving time

Technology companies have vast amount of computing resources in their data centers and many of their employees have home labs. These home labs are micro data centers purchased by employees to learn and gain experience with enterprise information technology software. Servers in corporate or micro data centers are sized for maximum demand and often have unused capacity.

author’s home lab pictured as it is working on coronavirus research. Lab consists of 3 Supermicro SuperServer E300-8D servers running the VMware SDDC platform

Folding@home VMware fling

An ad-hoc team @ VMware came together to deploy Folding@home both in corporate data centers and employees home labs. This team quickly built and shipped a VMware virtual appliance fling to package and make it easy for anyone to deploy the software. Flings are “engineer pet projects” freely distributed by VMware to the public. Approval was received by Dr. Greg Bowman the Director of Folding@home for VMware to host and distribute the virtual appliance with their project. I learned about the fling through an internal Slack channel and quickly deployed it to my 3 servers on March 20th when it was released.

current progress to date

Future Technical Blog Posts

Negligible Impact: A future blog post will explain how distributed resource scheduler (DRS) enforces my policies to provide Folding@home only excess compute capacity while not degrading my preexisting workloads.

Sustainability: I’ll also describe the energy impact to my home lab by adding these compute intensive Folding@home workloads in a separate post. I’ve taken steps for my home lab to efficiently use electricity and make this project sustainable for me.

How you can help

Non-profit Grant from your employer: VMware like many other companies provide a service learning program benefit to their employees. A grant to the employees non-profit of choice is given for the hours spent volunteering in the community. I’m planning to utilize VMware’s program for my volunteer work on Folding@home. One of the options I’m considering to direct the service learning grant is the Folding@home team at Washington University School of Medicine in St. Louis.

Computer and Personal Time: VMware’s customers and many in the technology industry from the IT channel through the largest technology companies like IBM, Microsoft, Dell, Google, Apple, and Amazon already have started a response. CRN recently published an article on how the channel partners are jumping in to support the cause. Consider contributing your excess computing capacity from your laptop or your server farm by joining the effort already underway at your company. If you the first in your organization, deploy the Folding@home VMware virtual appliance fling or the original software directly from Folding@home.

team VMware Folding@home statistics

In the beginning – my low cost blogging solution

Will I generate an audience? How long I will publish my blog? I decided to operate this blog as inexpensively as possible since I don’t know. The blog solution I cobbled together is almost free after the annual domain name cost.

blog architecture for bitofsnow.com

Goals

Longevity & Low Cost: Due to the unknown demand, low cost is a key goal. I migrated www.foxhill.org from a server in my basement to AWS S3 static website hosting 6 years ago. My total cost from AWS for www.foxhill.org has been about $1 for S3 over the entire 6 years. I don’t know about you, but I think that is essentially free. If the blog is low cost, there is little pain to leave the blog up in case of low demand or if I take a break from blogging.

Personalized Domain Name & Flexibility: I like choice in using any DNS service for my custom domain name. This provides flexibility for future uses I can’t imagine now. It is easier to use a vertical integrated blog SaaS solution but you may give up full control over your domain name. A blog SaaS has reoccurring charges for their service due to the work, support, and simplicity they provide to an average non-techie customer.

Components

AWS Public Cloud: I have a VMware vSphere based home lab with 3 robust servers which could easily handle the load of a dynamic web server for my blog. I decided to host the blog in the cloud based on my earlier experience with foxhill.org.

On a server in my basement for 15 years I hosted foxhill.org’s web site and email. In 2014 I migrated this site to the cloud. I decided to get out of the hosting business in 2014 due to the following reasons:

  • Maintenance: Production servers require frequent software patching and keeping the software up to date. My email server would run out of space at inconvenient times. Once the power supply failed on the server resulting in days of downtime and expedited shipping costs. I didn’t like being a slave to managing the production servers with the regular demands of life and work commitments.
  • Security: Software patching and upgrades both are part of important security practices. With the increased sophistication of hackers this is only one of the responsibilities to keep your site and home LAN secure. Hosting all of your services in the public cloud solves many security challenges.
  • ISP SPAM monitoring: One day in 2010 my home broadband was down. I was surprised to learn that my ISP shut my service off due to an abnormally high amount of inbound SPAM detected. This was inconvenient and started the process to move my email domain to the cloud.
  • Cost: Cloud services can range in cost from free to a large significant re-occurring expense. I discovered low cost solutions to migrate these services to the cloud making this a viable solution.

WordPress: WordPress is the leading blogging Content Management System (CMS). It is the leading supported platform with thousands of themes and plenty of educational content. I quickly learned how to use WordPress in a few days this week since it’s intuitive and full featured

The magic sauce – WP2Static: WordPress dynamically renders web pages from content stored in a database. The WP2Static plugin crawls through a WordPress site and creates all of the files to standup a static website. This means that there is no code on the web server and the static website consists only of files: html, images, CSS, and JavaScript. The static website can be deployed to any web server instead of requiring a WordPress server. Native features are unavailable once WordPress isn’t hosting the website. Examples of native features lost are comments, search, and most plugins. These trade offs are acceptable to me to achieve my goals. The benefits of a static website is speed, higher security since there is no server side code, and deployment flexibility. WP2Static has an automatic website deployment feature, which has been a time saver to deploy my blog to the AWS S3 static website.

One click publishing from WordPress to S3 with WP2Static

Ubuntu Linux: I decided to self-host WordPress for content development, management, and publishing. Since I already own a VMware vSphere based home lab, I quickly spun up a new Ubuntu Server 18.04 LTS virtual machine (VM) on it. I selected the Docker option during Ubuntu installation so I could deploy the multi-container WordPress package. The following blog provided instruction to install the WordPress containers. As an alternative, this solution may work with WordPress on Windows or Mac PC but I haven’t tried it.

AWS S3 Static Web Site Hosting: This is a simple and straight forward service which provides static websites. The cost of hosting a static web site on S3 is an order of magnitude less expensive than paying for a WordPress in a SaaS or IaaS model.

The first step is to configure S3 for hosting websites which is documented here. Copy all static website files generated from WP2Static to S3 allowing the public to read. Next configure S3 to use your index.html file created by WP2Static.

AWS Route 53 Domain Registration: I chose AWS to register my bitofsnow.com domain due to the low cost $12/year which includes domain privacy and lock. I noticed other providers are cheaper but domain privacy was an add-on making them more expensive. Once I requested my domain it took 18 minutes to go live and push the .com entry to Verisign. I was happy with the quick provisioning since AWS warned me it could take up to 3 days.

Cloudflare DNS: I’m using Cloudflare for my bitofsnow.com domain since it’s free, simple, fast, and secure. I have used Cloudflare 1.1.1.1 DNS resolver on my home router since they launched the service and have been pleased with it. An alternative is AWS Route 53, but it’s a paid service. Once the DNS for a domain is configured there isn’t any additional work. Cloudflare also offers DNS analytics for free which shows requests, traffic by country, and stats.

Google Analytics: Without a website analytics system it would be difficult to determine if the blog has an audience and what posts are popular. I selected Google Analytics since it’s a leading solution and free. AWS provides website analytics through their CloudFront CDN. I didn’t require a CDN which is an extra cost.

It was easier than I expected to setup Google Analytics. I copied the javascript code snippet provided when I setup my account and pasted into the WordPress footer.php. The code snippet is inserted prior to the final /body. WP2Static automatically creates the Google Analytics javascript in the static web pages it creates.

Zoho Email: Email wasn’t required for my blogging solution. However I’m taking advantage of the custom domain name I bought and use it for my personal email address. I didn’t find any free robust email solutions which support a custom domain name. I came across Zoho and was impressed in the value of their Mail Lite offering at $12 a year. It’s a modern email platform with a web mail experience similar to Gmail and Outlook.com.

Conclusion

I was able to find detailed instructions on the web how to configure each piece but not a complete solution to solve my needs. I hope this solution overview provides motivation for someone who’d like to get started blogging but has the same concerns I had.